About Me

My photo
WELCOME to my little arty world! Trying to make art is a huge part of my life ... love nothing more than messing around with inks and sprays and generally making a mess!

Sunday, 19 May 2019

Drastic Action !!!

Spent ages getting a really lovely Powertex Stone Art layer down on my little canvas
Was really pleased with it too - not something you hear me say very often!

So what do I do?
Go and wreck it of course

Had half an idea of where I was heading but sure did get lost along the way
Ended up with one almighty mess

So ... after many tweaks and left with the only choice of painting it all over and re-colouring (my lovely Stone Art layer is now completely obliterated by the way!) or ...

OR taking the scissors to it and trying to save the ammonites ... again, for once, I was really happy with the composition of them and having spent ages first making the clay and then making the ammonites themselves I hoped I could save them

Off to hubby in the garage with the request to "please remove the staples from the back of the canvas"
And then lots of tugging and pulling and snipping until I had the ammonites and a heap of wrecked canvas

Good job I did not sleep on it and attack it the next day because the very nature of Powertex is it dries ROCK HARD and no way would that canvas had come apart had I thought about it

Photos show the various stages of deconstruction ...

Photo on left - a lesson in how not to produce a piece of work
Photo on right - unstapled and prised from the frame
BUT - look at that frame!!!!  Was inspired the moment I saw it!!


Next two photos are the horrible bits cut from around the ammonites ... but, upon reflection, they might have been ok on a different project but too late - are now confined to the dustbin


 Eventually I had the ammonites just about holding together in one piece and a heap of wrecked canvas from around them


Remember the frame to which the canvas had been attached?  it sent me in a different direction to the one I had planned but what a find!


I took a small canvas board and put several Stone Art layers over it and the frame and then strengthened the back of the ammonites with strips of fabric and Powertex so it became quite a solid and strong piece

Not sure I am entirely happy with the result but something was salvaged from an utter disaster


Wednesday, 15 May 2019

WOYWW 519

Well it was fully my intention to join in on Whizzday each week but when your motivation and inspiration levels are zero and your desk is looking dreadfully empty there is not a lot to share

There actually is stuff on my desk today - left overs from surprises for the forthcoming 10th Anniversary Crop of this weird and wonderful blog-sharing business - an inspired thought up by our dearest and much loved Head Desker, Julia, al those years ago.  So if you want to see desks far more exciting than mine head along to The Stamping Ground and take a wander around the country, nay, the world, and see actual creative people in full flow.


So what is on my desk this bright and spring like Wednesday morning?

The clues are there!

Rubber gloves can mean only one thing (and then I forget to put them on!) - next to them two tubs of Stone Art which is another big hint.

On the far right are a few ammonites drying (collected from the beach this morning and now drying in the heat of  the conservatory ... or made yesterday with Stone Art Clay and left overnight ... you can pick whichever version you prefer but in my head they most definitely came from the beach!)

There is a small 8"x8" canvas all ready with its layer of Stone Art but inspiration is yet to strike so it will be sitting there for a good few more days, weeks, months yet I fear.
But you never know - it may well be transformed before the day is out

For those who do not have a clue what I am on about - rubber gloves + Stone Art can mean only one thing really ... Powertex!

So, aiming to keep She Who Must Be Obeyed happy I am keeping this short(ish) and sweet (hopefully)

Happy WOYWW Whizzday fellow bloggers!
xXx

PS:  See what happens when I forget the rubber gloves


The eagle-eyed of you might notice what is in the background but ... sshhh! Secrets!!!!!

Wednesday, 13 March 2019

WOYWW 510

Empty chairs at empty tables
(doing a LLJ here!!!)

OK so the chairs are actually occupied as I am sitting on one of them but the table is certainly emptyish

Totally lost the momentum that followed on from my truly wonderful workshops with Finnabair and have fizzled to a halt
AGAIN

All you can see on my workdesk this fine Wednesday (it is actually chucking it down but that is quite fine by me!) are two cards made yesterday and it felt like climbing Everest making them

Am very much not a card maker any more but even my love of mixed media seems to be eluding me right now

So, sorry dearest Julia - our esteemed leader and head desker over at THE STAMPING GROUND where the worldwide sharing of workdesks takes place each Wednesday - but there is not very much of anything to share again I'm afraid


Card on left is for the lady next door who has been poorly and the card on the right is for Great Nephew Henry who will be four next week

Not much else to be seen - you can just spot the pink handle of the Big Shot and the laptop and printer in the background as I have yet to print out the "Happy Birthday" for inside H's card - could stamp it, of course, but even that seems a step too far right now

H left the stand for his Rubik's Cube here last time he visited so you can see that - the black triangle on the right and that is standing on a little yellow "man" ... 3D printed by a friend in the US and very handy for all sorts of things

You might be wondering about the spanners ... the small one was intended for a canvas and the large one (which is too heavy for me to lift) just balances the board I use to craft on ... they were both daddy's and I like having them close whether I am being arty or not

Want to make a small thank you pressie for someone who was so very kind to me at Finnabair's workshop so hope to tackle that today ... really do need to figure out if all this messing about business really is still for me or if it has run its course and I should just walk away from it all - the indecision is getting to me a bit but am not going to be hasty and get rid of all my stuff just yet.  I enjoyed my Finnabair workshops so much surely that is a sign!

Happy Workdesk Wednesday'ing!!!

Friday, 22 February 2019

wishin' & hopin' ...

Felt a bit encouraged to just have a go at something ... anything ... to try and bring myself back from the brink of walking away from all this art business so just grabbed a canvas and my boxes of treasure and with a tiny scrap of an idea in my head I just had a play

Stuck to my newly discovered pale colours - but was fighting all the way not to paint it black!  


PRODUCTS USED:

Finnabair (Prima Marketing) 
Art Basics -
Heavy White Gesso / 3D Gloss Gel  / Heavy Body Gel

Art Ingredients -
Mica Powder - Lilac Opal Magic / Green Opal Magic (diluted in water)
Art Stones / Mini Art Stones
Glass Glitter - Midnight Blue / Violet
Micro Beads - Silver

Art Alchemy Acrylic Paint -
Opal Magic  : AquaRose /VioletGreen (old release)  
VioletGreen (new release)  / PinkBlue
Metallique : Ice Queen / Vintage Rose / Soft Satin / White Pearl
Metallique Wax : Old Silver / Rose Gold / White Gold / Blue Lagoon
Mint Sparkle / Heather Hills / Sweet Rose / Peacock
Old Denim / Electric Violet

Art Extravagance :
Icing Paste : Frosty Pearl
Glitter Set : Ebony & Ivory

Lindy's Stamp Gang 
Starburst Sprays - Frozen Jack Frost / Gag Me With A Spoon Gray
Glitz Spritz Sprays  - Steel Shimmer

DecoArt Media - Shimmer Mist White


My Finnabair weekend

After WEEKS and WEEKS of worrying and stressing over how I'd even get there, let alone cope, I made it to Amelia's Creative Crafts in Studley for a weekend with the wonderful Finnabiar ... the amazing lady that is Anna Dabrowska

Have done many of her classes now (20 actually!!!) but was so poorly last year, the effects of which have changed my life completely, so honestly thought I'd never see her again

Couldn't even contemplate that so as I got a bit stronger again I contacted Nikki, the owner of Amelia's, and told her of my concerns and she went out of her way to reassure me and so I booked in

Stress levels through the roof as the workshops drew ever closer - more meltdown's to both Finnabair and Nikki - but so, so wanted to get there

And get there I did!  Helped enormously over the weekend by Nikki I managed the two very long days ... but the time just flew because I was having such a wonderful time

First project was an all day class on Saturday called
"FLAMING HEART"


I very deliberately left a lot of white space because this is what I struggle with and I also chose a very different colour palette to anything I have ever done before - will certainly use similar colours again in future

Sunday morning saw us starting with
"POETRY OF PATINA"


Everyone used the same colours of Finnabair's rust paste and patina paste sets 
I bought the patina pastes when they were first launched but did not like them at all ... do now though and would like to do another project using these techniques at some point

The words under the dome in the centre of the pocket watch says
"be you, bravely"
Because I think I was this weekend!!!

Final project on Sunday afternoon was
"RUST PAINTED"


Again went with colours totally different to what I would normally choose but was disappointed at first as it was so pale compared to all the others and I feared adding the rust would just be a disaster

I even took it to Finn and asked if it was salvageable
She assured me it was 
and she was right OF COURSE!

All in all I was pleased with my projects ... not al quite as I had in my head but am happy with them none-the-less 

HUGE thanks to Finnabair herself and then to Nikki, Tracy, Holly & James of Amelia's Creative Crafts ... you made the whole weekend just a dream from start to finish and I loved every minute.

Friday, 4 January 2019

Welcome Rex !!!

And then there were two!
Great-nephews that is.
Two weeks early but along came Rex - made a Welcome Baby card along the same lines as ones I have made before

If you don't like tag cards then you won't like this because it is definitely a tag overload!


The final little tag is left blank to write on


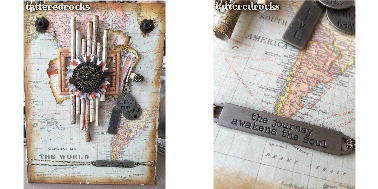
Take a trip

Saw a little travel journal made by Emma Williams on the Tim Holtz Addicts Facebook page and knew I had to do something along the same lines for my friend's daughter for whom travel is a passion.  

I didn't want a journal so did a small(ish) canvas instead & it was her Christmas present.

Huge thanks to Emma for helping me track down the paper pad!
Tim Holtz ideaology 12 x 12 Paper Stash - Correspondence

I added a few metal embellishments from my rummage box & framed it to make dusting easier!


Thursday, 3 January 2019

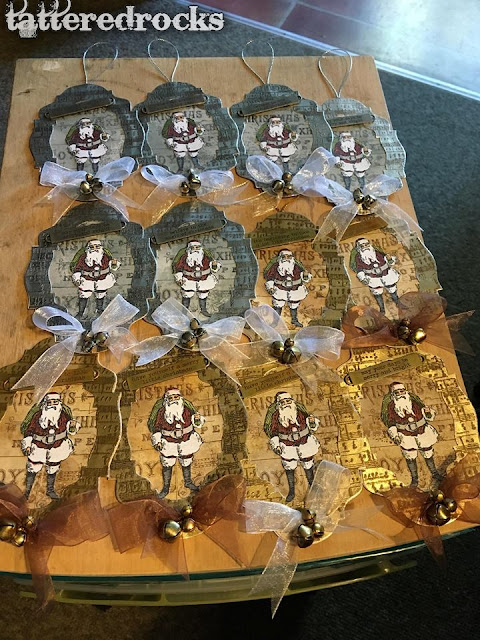
Baubles & hanging decorations

So there I was all smug and gloating that all my Christmas presents were either bought and wrapped or made and wrapped ... but then someone commented on the little hanging decorations I had made and that they were "just cardboard things" and that was enough to send me off into a tizz.

The cardboard things actually took quite a while to make but that was ok because I had them done well ahead of time - way before most folk even begin to think about Christmas - and I planned on sitting back and enjoying the festive season in a more relaxed state than is my norm.

Yeah, right!

Now thinking the cardboard things were not good enough I decided to make some baubles - only 12 because that was all I had left from a couple of years ago and now had no time to order any more.

As it turns out thank goodness there were only 12.

But first the cardboard things ... all Tim Holtz and a mixture of several of his techniques ...  the main element being the "metallic" edge.  This was a technique showcased by Tami Bastiaans where you stamp in Versamark on Tim's metallic kraft card and then emboss in silver powder.  Then you smear black distress crayon all over and wipe it back to make it look aged and vintage.  Very messy - but we all know I love messy!
I used brown distress crayon on the gold coloured ones and gold embossing powder too.


The baubles were Powertex ... started off with ivory coloured which I was then painting with black gesso but it was taking forever so bought some black Powertex which saved hours!

I was actually happy with these until I decided they needed a bit of sparkle - but by now I was in full on tizz mode as they had taken so long to make and postage dates were looming.  Needless to say I added WAY  too much sparkle and ruined the layer upon layer of colours I had managed to achieve with spray inks and acrylic paint and wax.  

Should have left well alone.
I didn't get a photo of the jewelled coloured ones ... those with blues and purples - which is a shame as I did not sparkle those as much as the others and did look so much better for it.

Very, very nearly painted over the whole lot to start re-colouring but just had neither time nor heart to redo them so had to admit I'd stuffed up and let them go as they were.


This shows them before I wrecked them with the sparkles 


Did keep a note of colours used for these!
Bases were all clear acrylic baubles
Scraps of old t-shirt type material
Ivory & Black Powertex
Art Basics Heavy Body Gel
Art Basics Soft Gloss Gel
Various beads & metal embellishments
Crushed Ice Crystals

BLUE & PURPLE :
 Finnabair for Prima Marketing Art Ingredients Mica Powder -
all diluted in water (or gin ... I do prefer to dilute in gin!)
Purple / Deep Water / Frozen Lake / Bottle Green / Teal
Lilac Opal Magic / Green Opal Magic
Art Alchemy Metallique Acrylic Paint -
Crocus Fields / Deep Waters / Emerald Green / Ice Queen / White Pearl
Art Alchemy Opal Magic Wax -
Green Brocade / Turquoise Satin / Royal Robes
Art Alchemy Antique Brilliance Wax -
Mystic Turquoise 
Art Alchemy Metallique Wax -
Old Silver / Brushed Iron

RED :
Lindy's Starburst -
Cowabunga Copper / Autumn Maple Crimson / Cajun Carnelian Red
Bayou Boogie Gold
Moon Shadow Mist - Bucket O Blood Red
Art Ingredients Mica Powder - Gold (diluted)
Art Alchemy Metallique Acrylic Paint -
Red Wine / Steampunk Copper

GREEN :
Lindy's Starburst -
Bayou Boogie Gold / Gater Gumbo Olive
Art Ingredients Mica Powder  - Bottle Green (diluted)
Art Alchemy Metallique Acrylic Paint -
Dark Forest / Steampunk Copper


Cards Cards Cards

After the first six bleak months of 2018 when I was barely able to leave our bedroom and made nothing more than a handful of birthday cards I did not see myself being able to make any Christmas cards at all.

But, time went on and things improved and I decided I simply could not bring myself to buy cards from a shop (and there are some beauties out there!) so thought I'd make a few cards at a time and see how I got on.  Got on quite well, actually, and made around 150ish ... not quite as many as usual but better than I expected to do.

Tim Holtz came to play ... well, at least his products ... and I did a variation on my much preferred tag cards for the family and close friends.  


So, still a tag but opened to please those that do not think my tags to be "proper" cards


Afraid it didn't occur to me to list the products I used ... the *s*n*o*w* was Finnabair's modelling paste through Tim Holtz's *S*n*o*w*cap stencil and Falling Stars stencil and then sprinkled with Glamour Dust. I used his Home for the Holidays thinlits dies by Sizzix and his Stampers Anonymous Christmastime stamp which stamped in red and then clear embossed.  .

Loved the crispness of the red against the white so then made a batch of my more regular tag shaped cards to add to the pile of general Christmas cards.


For the next batch I did my much loved swishing and swooshing of distress ink - the fabulous oxides this time - Black Soot and Hickory Grey splodged on my craft mat and spritzed with water and  Tim's (we've met -  I had a hug so am on first name terms now!) manilla tags were dragged through and left to dry and then water droplets distressed them even more.
Same stencil as before and the sentiment this time was from the Festive Overlay stamp set.


The last batch were a date with the Big Shot die-cutting trees, deer and logs but these came together quite quickly once that task was done.

Swished and swooshed the background again ... normal distress this time and old paper and antique linen spring to mind ... maybe with a bit of bundled sage thrown in.   Stamp was Tim's Music & Advert stamped using Versafine Clair Pinecone - added a little red bow that was flat enough not to incur the higher postage rate.


Then two final cards for the Great-nephews ... first our darling Henry - the three and a half year old whirlwind that keeps us all on our toes.

I saw the *s*n*o*w*man stamp on a friend's post and she very kindly stamped some out for me as it is a stamp I am unlikely to use in the future.

It did mean doing the dreaded colouring-in but, hey, if you look closely I even did shading!!!!!  


And then came Rex ... two months old on Christmas Eve 


Winter Memories

During a bit of a lull with my arty mojo I decided to work through an online class & kit by the very talented Dorota Kotowicz and purchased her Winter Memories Album from Mixed Media Place - rolled up my sleeves and spent a happy few days working my way through it.

I think the intention is to add photographs to the "postcards" that you add to the pages but I didn't want to do this so went ahead and decorated each postcard more fully than in  Dorota's video.  I also added a few extra bits and pieces that don't come in the kit. 


WOYWW 500 = WOW!!!

A huge WOW indeed for the 500 edition of WOYWW'ing and the hugest of
CONGRATULATIONS 
to our esteemed and very much loved, adored, cherished and cared for leader Julia who sits at head desk at The Stamping Ground

I was determined to join in today ... well, yesterday for today is now tomorrow and I am a day late ... but my problem was, is, I have no desk to show.  

Well, I could show you the dining room table which is where I am right now.
Or my warmer months desk out in the conservatory but that is buried under most of the contents of the kitchen as it continues its refit.

But ... and this is a big but ... any desk I could show you will be void of anything even remotely crafty or arty for I am busy battling with myself about whether I carry on or totally give up ... am at the totally giving up stage and have been for several weeks now but am not acting in haste and either binning or giving all my stuff away but, hand on heart honest, I think my attempts at anything even remotely art based are behind me.

Reason is not lack of mojo but rather facing the fact that I will never be able to produce anything I am even slightly happy with and no matter what wonderfully lovely comments my work gets I always think people are just being kind and bolstering me along - unfair thoughts from me I am sure but changing your psyche is bloomin' difficult and I have yet to manage it even a little bit.

I have learned to never say never but my mind feels pretty much made up - acceptance of my limitations and all that jazz.

So, I am about to blog the latest (and maybe the last) stuff I have done and hope to maybe make the crop in June (but doing WHAT I have no idea ... I hear talk of tea and cake so shall make tea and serve cake!) and end this sorry little post by thanking Julia for brining some AMAZING friends into my life ... truly friends for life ... and for the inspiration she had 500 weeks ago in starting what has turned out to be the phenomenal WOYWW!!!!!