About Me

My photo
WELCOME to my little arty world! Trying to make art is a huge part of my life ... love nothing more than messing around with inks and sprays and generally making a mess!

Friday, 20 March 2020

The violin's ringing like lovely song

Except this one isn't of course
 for it has a new song to sing now

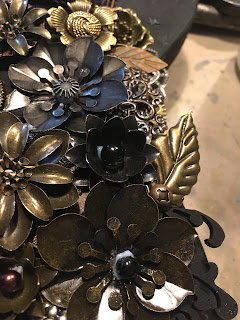
It was in an awful state, destined never to be played again and, being pretty certain it is not a Stradavarius , I arted it up

I had quite a clear plan in my head (as one of the photo's will show) and intended it to be like the night sky with the moon and the stars
Changed my mind but had no option than to leave the stencilled stars in the background ... would rather they have been something else but just had to go with them so am embracing the change of  design

Once ready to colour I found myself automatically reaching for my usual choices ... the background was already blue at this stage ready to become the night sky so another coat of gesso was required
and back to black it went

I gave myself a good talking to and put my much favoured blues and greens and purples back and picked my second most disliked colour ... YELLOW ... but kept the green adding to it a much brighter shade of green than I would normally use - had to add in a touch of my favourite copper but still no blue!!

From there I just kept layering and tweaking and layering some more until I felt happy with the colours

After quite a bleak period of no such artwork on my desk I did really enjoy doing this and am fairly happy with how it turned out
and it is not very often at all you will hear me say that!


 THREE coats later ...


Forgot to take a photo showing all the stencilled stars on the top and back but managed to remember in time to get a photo of them on the sides


Changed my mind about the moons and just about managed to pull them off
they had been left to dry overnight and I have to confirm what I know already - that Finnabair's Heavy Body Gel takes some beating - once it is stuck then it is stuck and I had to tear the base to get them off


Then I just kept adding bits here and there until I felt I  was happy with the composition
Never sure if I love or hate this stage
Stick this bit here ... stick another there ... don't like it so take it off again and move it somewhere else
Think I have it sorted - go to the loo & come back and utter a very colourful word like
Oh Blow!
and tweak it some more
finally decide it will do

Think the stars look stupid at this stage


So here it is all finished ... it will do!


Yes, I know these should be - and were - on the back of the ... of the what?  Whatever that bit you hold is called - my violin playing nephew suggested the scroll or neck
Anyway - I thought them far too interesting to be stuck at the back so artistic license came into force and I moved them to the front


At the end of it I don't think the stars look too bad - don't really fit the new theme but as I have no idea what that new theme turned out to be I guess that's ok!

PRODUCTS USED:
Finnabair for Prima Marketing  :
Art Basics Heavy Gesso - black
Art Basics Modelling Paste
Art  Basics Heavy Body Gel
Art Basics  3D Gloss Gel / Soft Gloss Gel
Art Ingredients Mica Powders - Sunny Yellow / Bottle Green / Copper
Art Alchemy Metallique Wax - Mint Sparkle / Vintage Gold / Bronze Age / White Gold / Aged Brass
Art Alchemy Opal Magic Wax - Green Brocade / Vintage Sik
Art Ingredients - Glass Glitter - Goldrush / Micro Beads - Bronze
Mechanicals - Sentiment plaque & some of the metal bits

Tim Holtz Stampers Anonymous Stencil - THS115 (stars)
Powertex - Wooden flourishes
Samantha K Elegant Mixed Media Frames - Medium / Small

Lindy's Stamp Gang Spray - Drop Dead Gorgeous Green
Perfect Pearls Mists - Sour Apple / Kiwi / Sunflower Sparkle


Wednesday, 18 March 2020

WOYWW 563

More of a “can you see what it is yet?” than a view of my desk
Sharing now to join in the weekly blog-hop courtesy of our much loved leader - Julia - over at  The Stamping Ground
I hate all this “sneaky peek” business to be honest - it’s more that I am not sure which way this is heading & I have already prised off several pieces that I stuck down yesterday (Finnabair’s Heavy Body Gel is not to be underestimated & ripping of the base surface was necessary!)
I will explain all when posting finished project

Very much a work in progress so forgive the horrible stage it is at now


Thank you to all of you whom visited me here on my previous WOYWW - I did reply to everyone, or tried to - I had a couple of blogs throw back my comments & had no luck.   But try I did - honest! 

Happy WOYWW’ing dear friends
xXx


Monday, 9 March 2020

From dinosaurs to Superheroes!

Seems I never got around to blogging Henry's 4th birthday card 
and as he is 5 this month I thought I'd do them both together
Time sure does fly and dinosaurs no longer quite hit the mark as he discovered Superheroes & The Avengers
so Great Auntie is on a steep learning curve educating herself on The Hulk, Captain America &, as his card will prove, H's favourite ... Iron Man

Barely a tag in sight!

Wasn't going to blog these at all but al the photos are clogging up my mobile and ipad so I figured if I put them on here then I can zap them to free up space!

These are a bunch of cards I made last year for my friend who raises funds for the RNLI and ... 
SHOCK! ... HORROR! ...
I actually made "proper" cards that open rather than my much preferred tag style cards
I knew my tags would not appeal to the masses so figured I'd best make cards that might ... hence the very different styles for me and out-of-my-comfort-zone colours

I managed to make 100 cards to send to her and feel sure there must be 99 of them left unsold but, hey, I did enjoy making them

Won't go into specific details as they are all pretty straightforward and self-explanatory to any card maker so this is very picture heavy but does save you reading all my ramblings


Ok - so a couple of tags snuck in there ... but I did use them on the fronts of opening cards so they don't count!


Wednesday, 4 March 2020

WOYWW 561 - Pick yourselves up!!!


Go on - admit it - you have fallen off your chair in shock for I am here!

For the uninitiated “here” is courtesy of the simply delightful & very much loved Julia who hosts the weekly worldwide blog hop over at 
which gives us bloggers the opportunity to see what fellow crafty artists have on their desks


Bit of a challenge as I am attempting this Workdesk Wednesday business from my iPad having little desire to power up my laptop.

So, what is on my desk?
A whole heap of not very much as I have had to put away all my messy & grungy mixed media stuff in order to make a very crisp & clean wedding card

All pretty straightforward really - everything cut out (well, almost) & ready to assemble. 

Annoyingly I have just spotted the two folders behind the jam-jar-water-pot - they are  podiatry nephew’s patient notes that he has me typing up for him & which will be done on the laptop - so answers on a postcard as to why I continue to try to blog from the iPad - DUH!!!

Julia likes it short & sweet so will not ramble on - I did spend a lovely weekend at workshops near Lincoln & the projects & story are in the post below this one for anyone interested.

So Happy WOYWW’ing everyone!


Monday, 2 March 2020

Art with Olga - Share the vision

Was quite taken with the projects that the delightfully crazy Olga Heldwein was bringing to Sue Tucker's Art Workshops & after MUCH thinking and deliberating, stressing & loss of sleep I decided to give them a go!

Oh, when I say Olga is delightfully crazy I had no idea of that ahead of time as she is not an artist I had come across before - but, now having spent a weekend in her company I am able to confirm she is just that!  

It took a lot of leaning on Sue to get me there - she was her usual remarkable self and went out of her way to make me feel I could possibly attend - nothing seemed too much trouble for her as I put hurdle after hurdle in her way - kinda, sorta hoping she would say, "sorry, Debbie, but don't think that would work"

She made everything work!
Even allowing Phil to stay with me (he kinda, sorta hoped it wouldn't work out either!) where she had not  ever allowed a "helper" to stay before
Really could not have managed without him ... the physical aspect of coping with my rather large hernias are very debilitating and as I now waddle like the British Gas penguin you can imagine my desire to remain hidden away - which I have done, even asking my family not to visit for a long time, so to put myself in a workshop situation was a huge step

I hasten to add my head is in a good place & it is all entirely down to vanity and usually limiting any public viewings of me to only being from the neck up - and that ain't a pretty picture either!

I get dreadfully uncomfortable and fidgety so a lot of shuffling went on towards the end of the day and I have to admit to having to leave half an hour early on the Saturday ... but I still managed ten and a half hours out which was considerably longer than the previous three or four hours I am normally out.  I pretty much made it to the end of the second day too - leaving just a little bit early again, but was not the first to leave so can live with that!

We booked a really FAB - U - LOUS little bungalow about half an hour away so made a long weekend of it and stayed from the Thursday until the Tuesday - an area (Lincolnshire) new to us so good to explore the unknown!

So to the projects -
Saturday morning was 
ROMANTIC LAYOUT
The idea was to  use a photograph
but I am never keen on using photos so took a little slate heart I had had hanging around for years
Was quite pleased with this one despite the fear of using permanent inks as opposed to my more favoured water reactive sprays!
Hey - I coped and will use them again!!!!!


Saturday afternoon was
FACES OF STEAMPUNK
Now, I went fully prepared not to use the faces 
I really dislike faces
BUT once I saw the projects for real I decided to go ahead
We had to make them ourselves from paper clay and a mould and then steampunk them up ... took a bit of a deep breath to stab them in the head with a paintbrush and pokey tool but it was an experience!


I wasn't able to get these finished during the workshop so brought them home and had to use different products to those in class but I am happy with how these turned out
They are not earrings as my nephew suggested - unless you have very large ears - as they are about the size of a CD

Sunday morning saw us tackling 
MECHANICAL BOX
Again I was not able to finish this project during the workshop but then nobody on my table did either so it was another one to bring home to complete
Had all the products needed this time so was able to get pretty much the effect Olga demonstrated


Final project on Sunday afternoon was 
VINTAGE SCRAPS
Again, wasn't able to finish these in the workshop and as I had brain failure when completing them at home I have struggled to keep these from the Box Of Failures
I freely admit to using totally the wrong product prior to dry brushing with all the white gesso ... the scraps should be very white indeed
BUT after hating them all week they have grown on me and I am embracing the shabby-grungy effect and channelling my Miss Haversham vibes
Actually quite like them now!


All in all I had a wonderful weekend
Felt stupid and out of place and totally the freak I now look
but also figured I hide myself away for ever or try to make the most of things and ignore the stares and nudgings and glggling
NOT that any of the lovely ladies at the workshops did any of that

Huge thanks needed to 
Sue - for allowing me to believe I could do it and then making it possible for me to do so
Olga - for the sharing of her talent and her wonderful projects, the fun and the laughter and her education of dangly bits
Lisa Francis - for her unending support, encouragement & friendship
Vicky Cornwell - for her friendship & encouragement and the giggles we have whenever we craft together

and finally to my Phil ... my absolute rock for sitting in a room full of women, doing something he was not keen to do and for his total and unending support - we had a bit of an adventure, didn't we!


Ps : Olga is on the far right ... told you she was crazy!
xXx


Saturday, 28 December 2019

Christmas Sparkles & Festive Wishes

All cards and presents now received so able to record them here!

This is a long post but I wanted to put all the Christmassy stuff in one place

Very smugly had the cards all done and dusted really early (well, very late for me but really early for most)
BUT
then when I came to write them I decided they needed tweaking
SO
tweaking I began and ended up stressed and fraught and crying 
not helped by a sniggering husband sitting across the table saying
"you do this to yourself every year ... "

Worst thing is him being right of course!

I had intended to stick the little stars actually onto the card itself  but did not like the look at all so went to Plan B ... to "simply" attach them to a strand of silver thread and have them dangle ... pleased this would solve two problems at once as tying the silver thread around the ribbon kept it nice and flat for posting 
but, oh my goodness the time it took!
longer than making the whole batch of cards in the first place

got there in the end though & this then had the 120 or so cards for friends sorted!


Products used :
Distress Ink Pads : Chipped Sapphire / Evergreen Bough / Dusty Concord / Black Soot
Versafine Clair Ink Pad : Twilight
Clear embossing powder
Inkylicious Stamp : Winter Cabin (small)
Tim Holtz Alterations (for Sizzix) Thinlits Die 663095
For the message on the back of the card : 
Tim Holtz (for Stampers Anonymous) : Christmastime CMS352
Encore Ultimate Metallic Ink Pad : Enchanted Evening

For family & close friends I made shaker cards
Those that know me know cards that open are not my thing
Tags are my thing
but no way were those shaker bubbles fitting on a tag
so went with opening cards - case in point ... as I handed my sister her envelope she said, "I hope it opens" 

The bubbles and frame around them were bought last year but I did not get round to making them then and am no longer able to recall from where they came ... I got six of the hearts and six of the circles 

Did my favourite splooshy-sploshy squishing of ink pads on my craft mat and spritzed with water and dragged the card through to get my favourite sorts of backgrounds.  Used the same colours and one of Tim's (we've met so are on first name terms LOL) stencils to make the tartan edge


Then there were four cards for our little great-nephews
three pretty much the same - 


and as Henry loves dinosaurs and has a wicked sense of humour I knew he'd 'get' the funny side of his card
Not my own design but one copied from one of Tim's design team members (so sorry I did not make a note of her name)


I bought the "Oh Deer" clipboards when Tim launched them in 2016 but had no inspiration to use them at all.  They languished in a box in the loft for three years until I decided this was the year to use them

Again all based on a design from one of Tim's design team members & just tweaked to make the most use of what bits and pieces I had already

The stencilled backgrounds on the actual clipboards are done with Finnabair's fantastic Icing Pastes

I did six with a green theme  


And two with a red theme


But then decided I did not really like the paper dolls so did four totally of my own design and wish now I had had this idea sooner - but I hadn't so had to resign myself to giving gifts I was not really happy with


They are all fully functioning clipboards but I did add a note suggesting they should be used for decoration only

Then I made six journals (for drawing, shopping lists, general note taking - whatever rocks your boat)
I did four of the burgundy ones and two of the blue


Products used (burgundy cover) :
All Finnabair's (for Prima Marketing) products unless otherwise stated -
Art Basics Heavy Gesso : Black / Clear
Art Basics Modelling Paste
Art Basics Heavy Body Gel
Finnabair Manuscript Stencil
Art Alchemy Acrylic Metallique Paint : Plum Preserves / Dark Velvet / Emerald Green / Stormy Ocean /
Art Alchemy Acrylic Opal Magic Paint : Violet Green
Lindy's Stamp Gang Starburst Spray  : Jazzy Jivin' Purple / Autumn Maple Crimson / Bayou Boogie Gold / Milk Chocolate Brown
Art Alchemy Opal Magic Wax : Royal Robes / Turquoise Satin
Art Alchemy Antique Brilliance Wax : Amethyst Magic
Art Alchemy Metallique Wax : White Gold
Art Ingredients Glass Glitter : Gold Rush
Art Ingredients Micro Beads : Berry


Products used (blue cover) :
All Finnabair's (for Prima Marketing) products unless otherwise stated -
Art Basics Heavy Gesso : Black / Clear
Art Basics 3D Gloss Gel
Art Basics Heavy Body Gel
Finnabair Bubbles Stencil
Art Alchemy Metallique Paint : Ice Queen / Midnight Sky / Deep Waters / White Pearl
Art Alchemy Acrylic Opal Magic Paint : Blue-Green / Violet-Green
Art Ingredients Mica Powder : Copper / Deep Water / Purple / Bottle Green
Lindy's Stamp Gang Starburst Spray : Afternoon Delight Denim / 
Voodoo Violet Blue
Art Alchemy Metallique Wax : Old Denim / Electric Violet / Old Silver
Art Ingredients Glass Glitter : Midnight Blue

Six little tins also got made - again loosely based on a design from one of Tim's team but I used only minimal "pre-made" bought items and tried to stamp and decorate as much as I could myself


 When eldest nephew number two & his wife were asked what they would like for Christmas they both messaged me back separately saying ALL they wanted was one of "Auntie Debbie's stitched tree decorations"
Now I had stopped doing these for a few reasons and certainly had figured the nephews and nieces-in-law were just being polite when they got one each year ... seems i was wrong!

Took some effort to track down the Mill Hill kits as the supplier I always used no longer trades but I found a few (and have stocked up for next year too!)
Other issue is my poor eyesight now (no sight in one eye and really rather bad in the other one) so I had put off even trying to cross-stitch or do beading
Out came my old illuminated & magnifying light and I surprised myself with being able to cope

So they got one each ... a Red Cardinal and a Panda


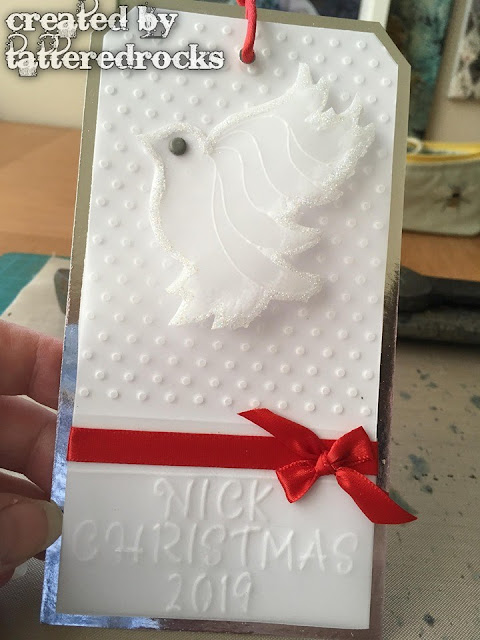
 I always make something with a dove theme for Phil's brother and wife and family in memory of their son

This year I decided on parchment ... now I LOVE to see parchment work but it has never been a craft I have enjoyed and long ago decided it was not for me
so why, oh why, did I decide on parchment?!?!?!?!?!?

My friend was very kind to lend me some of her Clarity Groovi plates (she does not live close so it was a through the post job) and I bought a whole load of pricking and piercing tools
but soon realised I was out of my depth ... was happyish with the the little I did but soon realised that even if I aimed for next Christmas I would never have them ready in time if I stuck to the pierced backgrounds I had envisaged

SO - I fully admit I cheated and ran the vellum through an embossing folder

No way can these be classed as parching so I have invented a new name - velluming ... definitely something I will avoid at all costs in future!

But cards were made in memory of our dear Nick again this Christmas and were handed out by his mom and dad yesterday


 And yes, yes, I know the doves are very poor and crumpled and twisted but, to me, they are okish as they look like they are fluttering across the card


All it leaves me to say - to those of you still awake after reading all my drivel is I hope you had a wonderful Christmas and that the new year brings you only good things.

Much love xXx