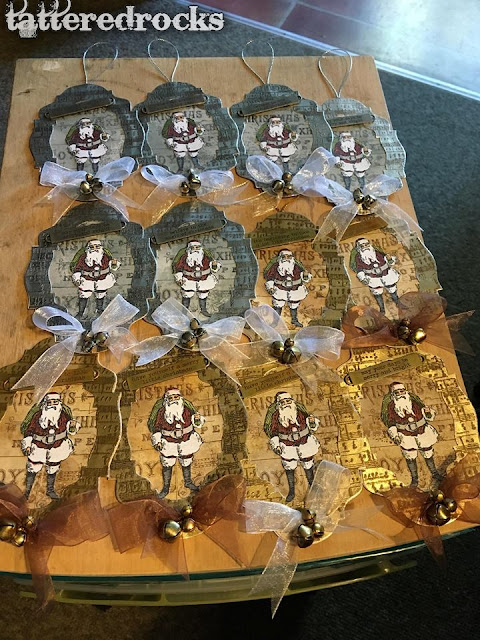
So there I was all smug and gloating that all my Christmas presents were either bought and wrapped or made and wrapped ... but then someone commented on the little hanging decorations I had made and that they were "just cardboard things" and that was enough to send me off into a tizz.
The cardboard things actually took quite a while to make but that was ok because I had them done well ahead of time - way before most folk even begin to think about Christmas - and I planned on sitting back and enjoying the festive season in a more relaxed state than is my norm.
Yeah, right!
Now thinking the cardboard things were not good enough I decided to make some baubles - only 12 because that was all I had left from a couple of years ago and now had no time to order any more.
As it turns out thank goodness there were only 12.
But first the cardboard things ... all Tim Holtz and a mixture of several of his techniques ... the main element being the "metallic" edge. This was a technique showcased by Tami Bastiaans where you stamp in Versamark on Tim's metallic kraft card and then emboss in silver powder. Then you smear black distress crayon all over and wipe it back to make it look aged and vintage. Very messy - but we all know I love messy!
I used brown distress crayon on the gold coloured ones and gold embossing powder too.
The baubles were Powertex ... started off with ivory coloured which I was then painting with black gesso but it was taking forever so bought some black Powertex which saved hours!
I was actually happy with these until I decided they needed a bit of sparkle - but by now I was in full on tizz mode as they had taken so long to make and postage dates were looming. Needless to say I added WAY too much sparkle and ruined the layer upon layer of colours I had managed to achieve with spray inks and acrylic paint and wax.
Should have left well alone.
I didn't get a photo of the jewelled coloured ones ... those with blues and purples - which is a shame as I did not sparkle those as much as the others and did look so much better for it.
Very, very nearly painted over the whole lot to start re-colouring but just had neither time nor heart to redo them so had to admit I'd stuffed up and let them go as they were.

This shows them before I wrecked them with the sparkles
Did keep a note of colours used for these!
Bases were all clear acrylic baubles
Scraps of old t-shirt type material
Ivory & Black Powertex
Art Basics Heavy Body Gel
Art Basics Soft Gloss Gel
Various beads & metal embellishments
Crushed Ice Crystals
BLUE & PURPLE :
Finnabair for Prima Marketing Art Ingredients Mica Powder -
all diluted in water (or gin ... I do prefer to dilute in gin!)
Purple / Deep Water / Frozen Lake / Bottle Green / Teal
Lilac Opal Magic / Green Opal Magic
Art Alchemy Metallique Acrylic Paint -
Crocus Fields / Deep Waters / Emerald Green / Ice Queen / White Pearl
Art Alchemy Opal Magic Wax -
Green Brocade / Turquoise Satin / Royal Robes
Art Alchemy Antique Brilliance Wax -
Mystic Turquoise
Art Alchemy Metallique Wax -
Old Silver / Brushed Iron
RED :
Lindy's Starburst -
Cowabunga Copper / Autumn Maple Crimson / Cajun Carnelian Red
Bayou Boogie Gold
Moon Shadow Mist - Bucket O Blood Red
Art Ingredients Mica Powder - Gold (diluted)
Art Alchemy Metallique Acrylic Paint -
Red Wine / Steampunk Copper
GREEN :
Lindy's Starburst -
Bayou Boogie Gold / Gater Gumbo Olive
Art Ingredients Mica Powder - Bottle Green (diluted)
Art Alchemy Metallique Acrylic Paint -
Dark Forest / Steampunk Copper


As the owner of a "Bauble" I am perhaps prejudiced in saying it was fab. My tree also liked it and embraced it with love ��
ReplyDelete